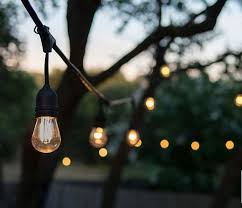
Outdoor LED strip lights have become a popular choice for homeowners, landscape designers, and business owners looking to enhance the ambiance, safety, and functionality of exterior spaces. These lights are flexible, energy-efficient, and capable of transforming gardens, patios, walkways, and architectural features with elegant illumination. However, to ensure long-lasting performance and reliability, proper installation is essential. Installing outdoor LED strip lights involves more than just sticking them in place—it requires careful planning, preparation, and use of the right components to withstand outdoor conditions. This article provides a comprehensive guide to installing outdoor LED strip lights effectively for durable and lasting results
Understanding Outdoor LED Strip Lights
Before diving into installation, it's important to understand what makes outdoor LED strip lights different from their indoor counterparts. Outdoor LED strip lights are specially designed to resist environmental elements such as rain, humidity, dust, and extreme temperatures. They are usually coated with a protective material like silicone or epoxy resin and have an IP (Ingress Protection) rating that indicates their resistance to water and debris. The higher the IP rating, the more suitable the strip is for outdoor use. Most outdoor applications require at least IP65-rated lights, while areas with direct water exposure, such as pool surroundings, may need IP67 or IP68-rated strips.Outdoor LED strip lights are also available in various colors, brightness levels, and control options. Some are single-color, while others offer RGB or RGBW color-changing capabilities. Choosing the right type depends on your desired lighting effect and functional needs.
Planning the Installation Layout
The first step in a successful installation is planning. Determine where you want to place the LED strip lights and what effect you want to achieve. Whether you’re outlining the perimeter of a deck, highlighting garden paths, or adding flair to a pergola, having a clear layout will help you decide on the length, brightness, and type of accessories you’ll need.Measure the area carefully to know how many meters of LED strip you require. Consider any corners or turns in your layout, as these may require connectors or flexible strip segments. Also, plan the placement of the power source. Since outdoor LED strip lights often run on low voltage (typically 12V or 24V), the power supply needs to be located within a safe distance. Ensure that the power source is easily accessible and can be protected from the weather.
Preparing the Surface and Environment
Proper surface preparation is critical for the longevity of the installation. Clean the surfaces where the LED strips will be mounted. Dust, dirt, and moisture can prevent the adhesive backing from sticking properly, which can lead to the lights falling off over time. Use a damp cloth to wipe down the area and allow it to dry completely before proceeding.If you're installing the lights on rough or uneven surfaces, consider using mounting clips or aluminum channels instead of relying solely on adhesive. These accessories offer better support and help with heat dissipation, which can extend the lifespan of the LEDs.Also, ensure that your installation area is safe and free from sharp edges or heavy traffic that might damage the lights. Avoid placing LED strips in locations where they might be stepped on or subjected to heavy loads unless you are using specially rated products for such conditions.
Connecting and Installing the LED Strip Lights
Once the surface is ready, unroll the LED strip and cut it to the required length. Most LED strips have designated cutting points, usually marked by a line or scissors icon, where they can be safely cut without damaging the circuit. Use sharp scissors or a blade and ensure that your cut is clean.Next, connect the strips to the power supply using compatible connectors or soldered wires. If your design includes multiple segments or turns, use waterproof connectors designed for outdoor use. These connectors not only maintain electrical continuity but also protect the wiring from moisture and corrosion.Secure the LED strip lights to the prepared surface. If the strip comes with a strong adhesive backing, remove the protective layer and press the strip firmly in place. Start at one end and move slowly along the length to ensure even contact. For extra stability or installations in more demanding environments, use mounting clips spaced every few inches or place the strip inside a mounting channel and secure it with screws.Protecting the Power
Supply and Wiring
One of the most common causes of failure in outdoor led strip lights is inadequate protection of the power supply and wiring. The power supply unit should always be housed in a weatherproof enclosure. This could be an outdoor-rated electrical box or a specially designed housing with proper ventilation.Use waterproof cable glands or grommets where cables enter or exit enclosures. Seal all entry points with silicone or weatherproof sealant to prevent water ingress. If possible, mount the power supply off the ground to avoid water pooling or flooding.Run the wiring along protected paths, such as under eaves, along fences, or through conduits. Avoid burying wires directly in the ground unless they are rated for direct burial. Even then, using conduit adds an extra layer of protection and makes future maintenance easier.
Testing the System Before Final Sealing
Before sealing any connections or finalizing the installation, test the entire system. Connect the power supply and turn on the lights to ensure that all segments are functioning correctly. Check for consistent brightness, correct color output, and smooth operation if using a controller.Inspect all connections for tightness and make sure no parts are overheating. Testing at this stage can save significant time and effort by allowing you to fix any issues before everything is permanently sealed or mounted.
Using Controllers and Automation
Outdoor LED strip lights can be controlled manually, by remote, or via automated smart systems. Choosing the right control method depends on your preferences and the complexity of your lighting design. If you want to change colors, dim the lights, or create lighting scenes, consider installing a compatible RGB or smart controller.Smart controllers allow integration with home automation systems, letting you schedule lighting or control it from your phone or voice assistant. Make sure any control units used outdoors are rated for weather resistance or installed in protected enclosures.
Maintaining Your LED Strip Lighting System
Even though LED strip lights are low-maintenance, occasional checks and cleaning can help them last even longer. Inspect the strips periodically to ensure they are still securely attached and free from damage. Clean the surface with a dry or slightly damp cloth to remove any dust or debris that might affect light output.Keep an eye on power connections and seals, especially after heavy rain or extreme weather. Address any flickering, dimming, or discoloration promptly, as these could be signs of electrical issues or water intrusion.If a segment of the strip fails, many systems allow for easy replacement of that portion without having to redo the entire installation. This modularity is one of the benefits of using LED strips over traditional lighting.
Conclusion
Installing outdoor LED strip lights is a rewarding project that can elevate the aesthetics, safety, and usability of any exterior space. With careful planning, proper materials, and attention to detail, you can achieve a professional-quality installation that will provide years of reliable performance. By selecting weatherproof components, preparing surfaces correctly, and securing wiring and power supplies appropriately, you ensure that your outdoor lighting not only looks great but also withstands the elements over time. Whether you're illuminating a garden, patio, driveway, or poolside, outdoor LED strip lights offer a flexible and durable solution that adds value and beauty to your space.