Some days ago, I created a post to describe Reactive programming supports in Spring 5 and its subprojects, all codes of that article were updated the latest Spring 5 RELEASE, check spring-reactive-sample under my Github account.
If you want to Gain In-depth Knowledge on Java Spring Boot, please go through this link Spring Boot Online Training
In this post, I will create a simple blog system, including:
- A user can sign in and sign out.
- An authenticated user can create a post.
- An authenticated user can update a post.
- Only the user who has ADMIN role can delete a post.
- All users(including anonymous users) can view post list and post details.
- An authenticated user can add his comments to a certain post.
The backend will be built with the latest Spring 5 reactive stack, including:
- Spring Boot 2.0, at the moment the latest version is 2.0.0.M7
- Spring Data MongoDB supports reactive operations for MongoDB
- Spring Session adds reactive support for
WebSession - Spring Security 5 aligns with Spring 5 reactive stack
The frontend is an Angular based SPA and it will be generated by Angular CLI.
The source code is hosted on Github
Backend APIs
Prerequisites
Make sure you have already installed the following software.
- Oracle Java 8 SDK
- Apache Maven
- Gradle
- Your favorite IDE, including :
NetBeans IDE
Eclipse IDE (or Eclipse based IDE, Spring ToolSuite is highly recommended)
Intellij IDEA
Generate the project skeleton
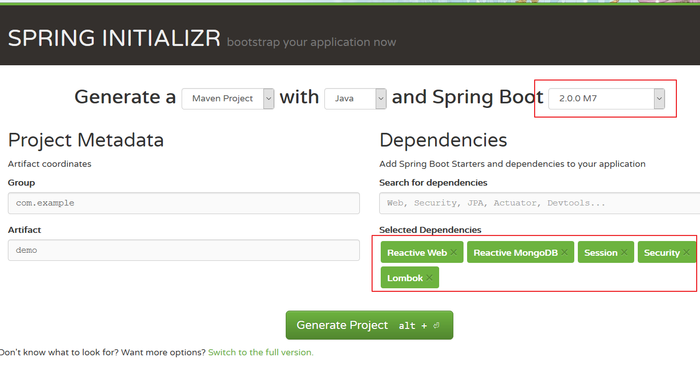
The quickest approach to start a Spring Boot based is using the Spring initializr.
Open browser, and navigate to http://start.spring.io.
Choose the following stack:
- Use the default Maven as building tool, and Java as programming language
- Set Spring Boot version to 2.0.0.M7
- In the search dependencies box, search reactive, select Reactive Web, Reactive MongoDB in the search results, and then add Security, Session, Lombok in the same way etc.
Hint Generate Project button or press ALT+ENTER keys to download the generated codes.
Extract files into your local system, and import it into your favorite IDE.
If you want more info go through Explain about Spring Boot Starter and its features
Produces RESTful APIs
Let's start with cooking the Post APIs, the expected APIs are listed below.
Create a Post POJO class. Add Spring Data MongoDB specific @Document annotation on this class to indicate it is a MongoDB document.
@Document

@Data

@ToString

@Builder

@NoArgsConstructor

@AllArgsConstructor

class Post implements Serializable {


    @Id

    private String id;


    @NotBlank

    private String title;


    @NotBlank

    private String content;

}
To remove getters and setters, toString, equals, hashCode methods from Post and make the source code looks clearly, let's use Lombok specific annotations to generate these required facilities at compile time via annotation processor tooling support.
Create a PostRepository interface for Post document. Make sure it is extended from the ReactiveMongoRepository, which is the reactive variant of MongoRepository interface and it is ready for reactive operations.
interface PostRepository extends ReactiveMongoRepository<Post, String> {

}
Let's create a PostController class to expose RESTful APIs.
@RestController()

@RequestMapping(value = "/posts")

class PostController {


    private final PostRepository posts;


    public PostController(PostRepository posts) {

        this.posts = posts;

    }


    @GetMapping("")

    public Flux<Post> all() {

        return this.posts.findAll();

    }


    @PostMapping("")

    public Mono<Post> create(@RequestBody Post post) {

        return this.posts.save(post);

    }


    @GetMapping("/{id}")

    public Mono<Post> get(@PathVariable("id") String id) {

        return this.posts.findById(id);

    }


    @PutMapping("/{id}")

    public Mono<Post> update(@PathVariable("id") String id, @RequestBody Post post) {

        return this.posts.findById(id)

                .map(p -> {

                    p.setTitle(post.getTitle());

                    p.setContent(post.getContent());


                    return p;

                })

                .flatMap(p -> this.posts.save(p));

    }


    @DeleteMapping("/{id}")

    @ResponseStatus(NO_CONTENT)

    public Mono<Void> delete(@PathVariable("id") String id) {

        return this.posts.deleteById(id);

    }


}
It is very similar with traditional Servlet based @RestController, the difference is here we use Reactor specific Mono and Flux as return result type.
Create a CommandLineRunner component to insert some dummy data when the application is started.
@Component

@Slf4j

class DataInitializer implements CommandLineRunner {


    private final PostRepository posts;


    public DataInitializer(PostRepository posts) {

        this.posts = posts;

    }


    @Override

    public void run(String[] args) {

        log.info("start data initialization  ...");

        this.posts

                .deleteAll()

                .thenMany(

                        Flux

                                .just("Post one", "Post two")

                                .flatMap(

                                        title -> this.posts.save(Post.builder().title(title).content("content of " + title).build())

                                )

                )

                .log()

                .subscribe(

                        null,

                        null,

                        () -> log.info("done initialization...")

                );


    }


}
Now we are almost ready to start up the application. But before this you have to make sure there is a running MongoDB instance.
I have prepared docker-compose.yml in the root folder, utilize it, we can bootstrap a MongoDB instance quickly in Docker container.
Open your terminal, and switch to the root folder of this project, run the following command to start a MongoDB service. Read on to find more Spring Boot Online Course
docker-compose up mongodbNOTE: You can also install a MongoDB server in your local system instead.
Now try to execute mvn spring-boot:run to start up the application.
Or click Run action in the project context menu in your IDE.
When it is started, open another terminal window, use curl or httpie to have a test.
curl http://localhost:8080/postsYou should see some result like this.
curl http://localhost:8080/posts

[{"id":"5a584469a5f5c7261cb548e2","title":"Post two","content":"content of Post two"},{"id":"5a584469a5f5c7261cb548e1","title":"Post one","content":"content of Post one"}]
Great! it works.
Next let's add access control rules to protect the Post APIs.
Protect APIs
Like traditional Servlet based MVC, when spring-security-web is existed in the classpath of a webflux application, Spring Boot will configure security automatically.
To customize security configuration, create a standalone @Configuration class.
@Configuration

class SecurityConfig {


    @Bean

    SecurityWebFilterChain springWebFilterChain(ServerHttpSecurity http) throws Exception {


        //@formatter:off

        return http

                    .csrf().disable()

                .and()

                    .authorizeExchange()

                    .pathMatchers(HttpMethod.GET, "/posts/**").permitAll()

                    .pathMatchers(HttpMethod.DELETE, "/posts/**").hasRole("ADMIN")

                    .pathMatchers("/posts/**").authenticated()

                    .pathMatchers("/user").authenticated()

                    .pathMatchers("/users/{user}/**").access(this::currentUserMatchesPath)

                    .anyExchange().permitAll()

                .and()

                    .build();

        //@formatter:on

    }


    private Mono<AuthorizationDecision> currentUserMatchesPath(Mono<Authentication> authentication, AuthorizationContext context) {

        return authentication

            .map(a -> context.getVariables().get("user").equals(a.getName()))

            .map(AuthorizationDecision::new);

    }


    @Bean

    public ReactiveUserDetailsService userDetailsService(UserRepository users) {

        return (username) -> users.findByUsername(username)

            .map(u -> User.withUsername(u.getUsername())

                .password(u.getPassword())

                .authorities(u.getRoles().toArray(new String[0]))

                .accountExpired(!u.isActive())

                .credentialsExpired(!u.isActive())

                .disabled(!u.isActive())

                .accountLocked(!u.isActive())

                .build()

            );

    }

}
In this configuration, we defined a SecurityWebFilterChain bean to change default security path matching rules as expected. And we have to declare a ReactiveUserDetailsService bean to customize the UserDetailsService, eg. fetching users from our MongoDB.
Create the required User document and UserRepository interface.
@Data

@ToString

@Builder

@NoArgsConstructor

@AllArgsConstructor

@Document

class User {


    @Id

    private String id;

    private String username;


    @JsonIgnore

    private String password;


    @Email

    private String email;


    @Builder.Default()

    private boolean active = true;


    @Builder.Default()

    private List<String> roles = new ArrayList<>();


}
In UserRepository, add a new findByUsername method to query user by username, it returns Mono<User>.
public interface UserRepository extends ReactiveMongoRepository<User, String> {


    Mono<User> findByUsername(String username);

}
Now let's handle authentication.
In the real world, in order to protect REST APIs, token based authentication is mostly used.
Spring Session provides a simple strategy to expose the session id in http response headers and check validation of session id in http request headers.
Take your career to new heights of success with an Spring Boot Course
Currently, Spring Session provides reactive supports for Redis and MongoDB. In this project, we use MongoDB as an example.
Add spring-session-data-mongodb into the project classpath.
<dependency>

  <groupId>org.springframework.session</groupId>

  <artifactId>spring-session-data-mongodb</artifactId>

</dependency>
To force HTTP BASIC authentication to manage sessions by MongoDB, add the following configuration in SecurityConfig.
http

  .csrf().disable()

  .httpBasic().securityContextRepository(new WebSessionServerSecurityContextRepository())

.and()
Declare WebSessionIdResolver bean to use HTTP header to resolve session id instead of cookie.
@Configuration

@EnableMongoWebSession

class SessionConfig {


    @Bean

    public WebSessionIdResolver webSessionIdResolver() {

        HeaderWebSessionIdResolver resolver = new HeaderWebSessionIdResolver();

        resolver.setHeaderName("X-AUTH-TOKEN");

        return resolver;

    }

}
Expose current user by REST APIs.
@GetMapping("/user")

public Mono<Map> current(@AuthenticationPrincipal Mono<Principal> principal) {

    return principal

            .map( user -> {

                Map<String, Object> map = new HashMap<>();

                map.put("name", user.getName());

                map.put("roles", AuthorityUtils.authorityListToSet(((Authentication) user)

                        .getAuthorities()));

                return map;

            });

}
When the user is authenticated, the user info can be fetched from an injected Principal.
Add the initial users in the DataInitializer bean.
this.users

    .deleteAll()

    .thenMany(

        Flux

            .just("user", "admin")

            .flatMap(

                username -> {

                    List<String> roles = "user".equals(username)

                        ? Arrays.asList("ROLE_USER")

                        : Arrays.asList("ROLE_USER", "ROLE_ADMIN");


                    User user = User.builder()

                        .roles(roles)

                        .username(username)

                        .password(passwordEncoder.encode("password"))

                        .email(username + "@example.com")

                        .build();

                    return this.users.save(user);

                }

            )

    )

    .log()

    .subscribe(

        null,

        null,

        () -> log.info("done users initialization...")

    );
Restart the application and have a try.
curl -v http://localhost:8080/auth/user -u user:password

*   Trying ::1...

* TCP_NODELAY set

* Connected to localhost (::1) port 8080 (#0)

* Server auth using Basic with user 'user'

> GET /auth/user HTTP/1.1

> Host: localhost:8080

> Authorization: Basic dXNlcjpwYXNzd29yZA==

> User-Agent: curl/7.57.0

> Accept: */*

>

< HTTP/1.1 200 OK

< transfer-encoding: chunked

< Content-Type: application/json;charset=UTF-8

< Cache-Control: no-cache, no-store, max-age=0, must-revalidate

< Pragma: no-cache

< Expires: 0

< X-Content-Type-Options: nosniff

< X-Frame-Options: DENY

< X-XSS-Protection: 1 ; mode=block

< X-AUTH-TOKEN: 39af0166-0f5f-4a1a-a955-21340b0b31b1

<

{"roles":["ROLE_USER"],"name":"user"}* Connection #0 to host localhost left intact
As you see, there is a X-AUTH-TOKEN header in the response headers when the authentication is successful.
Try to add X-AUTH-TOKEN to HTTP request headers and access the protected APIs.
curl -v http://localhost:8080/auth/user  -H "X-AUTH-TOKEN: 39af0166-0f5f-4a1a-a955-21340b0b31b1"

*   Trying ::1...

* TCP_NODELAY set

* Connected to localhost (::1) port 8080 (#0)

> GET /auth/user HTTP/1.1

> Host: localhost:8080

> User-Agent: curl/7.57.0

> Accept: */*

> X-AUTH-TOKEN: 39af0166-0f5f-4a1a-a955-21340b0b31b1

>

< HTTP/1.1 200 OK

< transfer-encoding: chunked

< Content-Type: application/json;charset=UTF-8

< Cache-Control: no-cache, no-store, max-age=0, must-revalidate

< Pragma: no-cache

< Expires: 0

< X-Content-Type-Options: nosniff

< X-Frame-Options: DENY

< X-XSS-Protection: 1 ; mode=block

<

{"roles":["ROLE_USER"],"name":"user"}* Connection #0 to host localhost left intact
Yeah, it works as expected. You can try more example on other protected path, such as creating and updating posts.
Exception Handling
For traditional Servlet stack, we can use @ExceptionHandler to handle the exceptions and convert them into HTTP friendly messages.
In a webflux based application, we can declare a WebExceptionHanlder bean to archive this purpose.
For example, if there is no posts found by id, throw a PostNotFoundException, and finally convert it to a 404 error to HTTP client. Learn more info at Spring Boot Training
Declare PostNotFoundExcpetion as a RuntimeException.
public class PostNotFoundException extends RuntimeException {

    public PostNotFoundException(String id) {

        super("Post:" + id +" is not found.");

    }

}
Throw an PostNotFoundException when it is not found, eg. the get method in PostController.
@GetMapping("/{id}")

public Mono<Post> get(@PathVariable("id") String id) {

    return this.posts.findById(id).switchIfEmpty(Mono.error(new PostNotFoundException(id)));

}
Declare a WebExceptionHanlder bean to handle PostNotFoundException.
@Component

@Order(-2)

@Slf4j

public class RestExceptionHandler implements WebExceptionHandler {


private ObjectMapper objectMapper;


    public RestExceptionHandler(ObjectMapper objectMapper) {

        this.objectMapper = objectMapper;

    }


    @Override

    public Mono<Void> handle(ServerWebExchange exchange, Throwable ex) {

      if (ex instanceof PostNotFoundException) {

            exchange.getResponse().setStatusCode(HttpStatus.NOT_FOUND);


            // marks the response as complete and forbids writing to it

            return exchange.getResponse().setComplete();

        }

        return Mono.error(ex);

    }

}
For the bean validations, we can convert the WebExchangeBindException to a UnprocessableEntity error to client, please see the complete codes of RestExceptionHandler for more details.
In the backend codes, I have added some features mentioned at the beginning of this post, such as comment endpoints, and also tried to add pagination, and data auditing feature(when it is ready).
Next let's try to build a simple Angular frontend application to shake hands with the backend APIs.
Scalable web application on Kubernetes
Containers are a standard way to package apps and all their dependencies so that you can seamlessly move the apps between environments. Unlike virtual machines, containers do not bundle the operating system. Only the app code, run time, system tools, libraries, and settings are packaged inside containers. Containers are more lightweight, portable, and efficient than virtual machines.
Let's Get more knowledge on spring Kubernetes go with How to utilize Spring Boot Microservices on Kubernetes
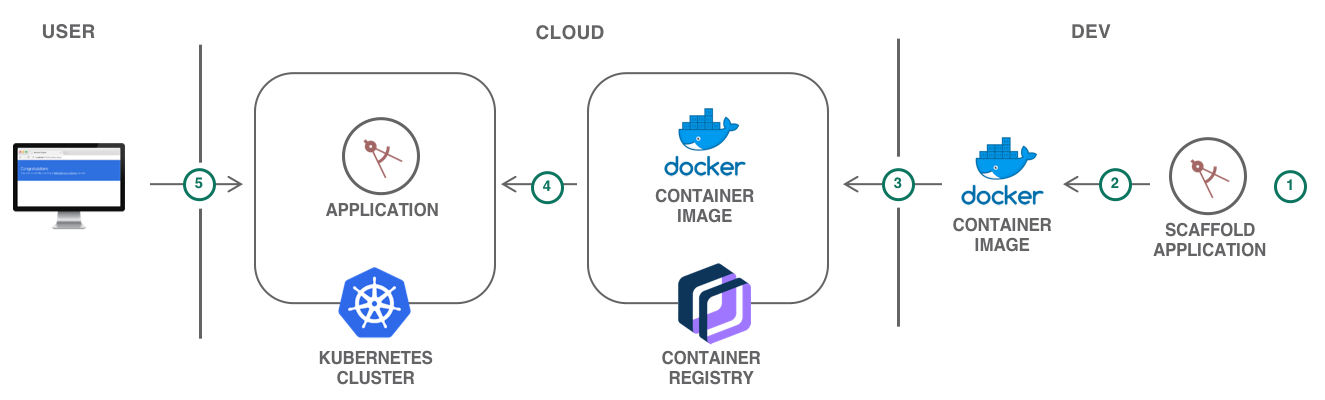
For developers looking to kickstart their projects, the IBM Cloud Developer Tools CLI enables rapid application development and deployment by generating template applications that you can run immediately or customize as the starter for your own solutions. In addition to generating starter application code, Docker container image and CloudFoundry assets, the code generators used by the dev CLI and web console generate files to aid deployment into Kubernetes environments. The templates generate Helm charts that describe the application’s initial Kubernetes deployment configuration, and are easily extended to create multi-image or complex deployments as needed.
Create a Kubernetes cluster
Kubernetes Service delivers powerful tools by combining Docker and Kubernetes technologies, an intuitive user experience, and built-in security and isolation to automate the deployment, operation, scaling, and monitoring of containerized apps in a cluster of compute hosts.
The major portion of this tutorial can be accomplished with a Free cluster. Two optional sections relating to Kubernetes Ingress and custom domain require a Standard cluster.
A minimal cluster with one (1) zone, one (1) worker node and the smallest available size (Flavor) is sufficient for this tutorial.
- Create the Kubernetes cluster:
For Kubernetes on VPC infrastructure, you are required to create a VPC and subnet(s) prior to creating the Kubernetes cluster. You may follow the instructions provided under the Creating a standard VPC Gen 1 compute cluster in the console.
For Kubernetes on Classic infrastructure follow the Creating a standard classic cluster instructions.
- Gain access to your cluster as described on the Access tab of your cluster.
For more information on gaining access to your cluster and to configure the CLI to run kubectl commands, check the CLI configure section
- Initialize the environment variable with the cluster name
export MYCLUSTER=<CLUSTER_NAME>

 ibmcloud ks cluster config --cluster ${MYCLUSTER}
Create a starter application
The ibmcloud dev tooling greatly cuts down on development time by generating application starters with all the necessary boilerplate, build and configuration code so that you can start coding business logic faster.
- Start the
ibmcloud devwizard to create a new directory in the current working directory.
ibmcloud dev createYou may be asked to target an organization and a space, follow the instructions on the CLI
- Select
Backend Service / Web App>Java - MicroProfile / JavaEE>Java Web App with Eclipse MicroProfile and Java EEto create a Java starter. (To create a Node.js starter instead, useBackend Service / Web App>Node>Node.js Web App with Express.js (Web App)) - Enter a unique name for your application such as
<your-initials>kubeapp. - Select the resource group where your cluster has been created.
- Do not add additional services.
- Do not add a DevOps toolchain, select manual deployment.
- Select Helm-based deployment target.
This generates a starter application complete with the code and all the necessary configuration files for local development and deployment to cloud on Cloud Foundry or Kubernetes.
Client
Prerequisites
Make sure you have already installed the following software.
- The latest NodeJS, I used NodeJS 9.4.0 at the moment.
- Your favorite code editors, VS Code, Atom Editor, Intellij WebStorm etc.
Install Angular CLI globally.
npm install -g @angular/cliMake sure it is installed correctly.
> ng -v


    _                      _                 ____ _     ___

   / \   _ __   __ _ _   _| | __ _ _ __     / ___| |   |_ _|

  / △ \ | '_ \ / _` | | | | |/ _` | '__|  | |   | |    | |

 / ___ \| | | | (_| | |_| | | (_| | |      | |___| |___ | |

/_/   \_\_| |_|\__, |\__,_|_|\__,_|_|       \____|_____|___|

               |___/


Angular CLI: 1.6.3

Node: 9.4.0

OS: win32 x64

Angular:
Prepare client project skeleton
Open your terminal, execute the following command to generate an Angular project.
ng new clientInstall Angular Material, Angular FlexLayout from Angular team.
npm install --save @angular/material @angular/cdk @angular/flex-layoutSome Material modules depend on @angular/animations. Import BrowserAnimationsModule in AppModule.
import {BrowserAnimationsModule} from '@angular/platform-browser/animations';


@NgModule({

  ...

  imports: [BrowserAnimationsModule],

  ...

})

export class AppModule { }
Open polyfills.ts, uncomment the following line,
import 'web-animations-js';Then install web-animations polyfill.
npm install --save web-animations-jsTo enable gesture in Angular Material, install hammerjs.
npm install --save hammerjsImport it in polyfills.ts.
import 'hammerjs';Generate the project structure
Follow the official Angular Style Guide, use ng command to generate expected modules and components. We will enrich them later.
ng g module home --routing=true

ng g module auth --routing=true

ng g module post --routing=true

ng g module user --routing=true

ng g module core

ng g module shared


ng g c home --module home

ng g c post/post-list --module post

ng g c post/post-form --module post

ng g c post/new-post --module post

ng g c post/edit-post --module post

ng g c post/post-details --module post

ng g c user/profile --module user

ng g c auth/signin --module auth
To simplify the coding work, I port my former Angular 2.x work to this project, more about the Angular development steps, check the wiki pages.
Angular 4.x introduced new HttpClientModule(located in @angular/common/http) instead of the original @angular/http module. I updated the original codes to use HttpClientModule to interact with REST APIs in this project.
Interact REST APIs with HttpClientModule
Let's have a look at the refreshed PostService. Here we use new HttpClient to replace the legacy Http, the usage of HttpClient is similar with Http, the most difference is its methods return an Observable by default.
const apiUrl = environment.baseApiUrl + '/posts';


@Injectable()

export class PostService {


  constructor(private http: HttpClient) { }


  getPosts(term?: any): Observable<any> {

    const params: HttpParams = new HttpParams();

    Object.keys(term).map(key => {

      if (term[key]) { params.set(key, term[key]); }

    });

    return this.http.get(`${apiUrl}`, { params });

  }


  getPost(id: string): Observable<any> {

    return this.http.get(`${apiUrl}/${id}`);

  }


  savePost(data: Post) {

    console.log('saving post:' + data);

    return this.http.post(`${apiUrl}`, data);

  }


  updatePost(id: string, data: Post) {

    console.log('updating post:' + data);

    return this.http.put(`${apiUrl}/${id}`, data);

  }


  deletePost(id: string) {

    console.log('delete post by id:' + id);

    return this.http.delete(`${apiUrl}/${id}`);

  }


  saveComment(id: string, data: Comment) {

    return this.http.post(`${apiUrl}/${id}/comments`, data);

  }


  getCommentsOfPost(id: string): Observable<any> {

    return this.http.get(`${apiUrl}/${id}/comments`);

  }


}
Another awesome feature of the HttpClientModule is it added the long-awaited HttpInterceptor officially.
We do not need @covalent/http to get interceptor support now.
const TOKEN_HEADER_KEY = 'X-AUTH-TOKEN';


@Injectable()

export class AuthInterceptor implements HttpInterceptor {


  constructor(private token: TokenStorage, private router: Router) { }


  intercept(req: HttpRequest<any>, next: HttpHandler):

    Observable<HttpSentEvent | HttpHeaderResponse | HttpProgressEvent | HttpResponse<any> | HttpUserEvent<any>> {


    if (this.token.get()) {

      console.log('set token in header ::' + this.token.get());

      req.headers.set(TOKEN_HEADER_KEY, this.token.get());

    }


    return next.handle(req).do(

      (event: HttpEvent<any>) => {

        if (event instanceof HttpResponse) {

          const token = event.headers.get(TOKEN_HEADER_KEY);

          if (token) {

            console.log('saving token ::' + token);

            this.token.save(token);

          }

        }

      },

      (err: any) => {

        if (err instanceof HttpErrorResponse) {

          console.log(err);

          console.log('req url :: ' + req.url);

          if (!req.url.endsWith('/auth/user') && err.status === 401) {

            this.router.navigate(['', 'auth', 'signin']);

          }

        }

      }

    );

  }


}
Compare the HTTP interceptor provided in @covalent/http, the official HttpInterceptor is more flexible, and it adopts the middleware concept. For more Additional info at Spring Boot Certification