Welcome to our comprehensive guide on Salesforce mass email sending. Whether you’re a tech-savvy professional or someone new to the platform, this article has got you covered.
We’ll explore various methods and techniques to send mass emails using Salesforce.
Read on to learn how to send targeted marketing campaigns or important updates to your customers. This article walks you through the process step by step and uncovers various methods and features available to help you reach a large audience effortlessly.
Note: This article is for existing Salesforce users. It assumes that you’ve already set up Salesforce, so those steps won’t be covered.
Salesforce mass email limits
Knowing your Salesforce limits helps secure a smooth and efficient emailing experience. Here are the highlights at the time of this writing.
- Daily Mass Email Limit
This limit is there to prevent abuse and maintain high deliverability. And it varies depending on your Salesforce edition and the number of user licenses.
Note that the ‘daily mass email limit’ described here is the total maximal number of emails you can send per day, across all options and Editions.
As per Salesforce Help Center, the limit is 5000 emails. And in Apex and API, the limitation is the same.
Make sure to check your specific edition’s limit to ensure you stay within the allowed quota. Note that the highest mass email limit typically applies to the Enterprise Edition.
2. Recipient Limit:
The Salesforce recipient limit also depends on your edition and the type of emails. For instance, for the six Editions of Salesforce, the recipient limit ranges from a few dozen to 5,000 recipients per mass email.
To stress, the maximal number is again 5,000 but it pays to touch upon the concept so you can better understand the logic.
For example, you could send one email to 5,000 recipients, thus exhausting your limit on the highest Editions. Or you could send multiple emails to specific recipient cohorts, to the same effect. For instance, 10 different emails to 500 recipients each.
Either way, the cap is 5,000 on the highest plan, and you need to carefully plan your campaigns to avoid exhausting the limit too fast.
Pro Tip: If the same external email address appears under different email marketing lists/campaigns, the address will be counted toward the limitation each time.
3. Data Size Limit:
Each email you send has a maximum data size limit, which includes the combined size of the email content, attachments, and merged fields. The limit varies based on your Salesforce edition and ranges from a few MBs to 25 MB.
The max limit is the same in Lightning Experience and Salesforce Classic, but there’s a difference in the number of attachments you can include.
- Salesforce Classic – 10+ attachments, not exceeding 25MB
- Lightning Experience – up to 10 attachments, not exceeding 25MB
4. Email Template Limitations
Salesforce caps the number of templates at 500 for all organizations under Trial or Free plans. For more information on Salesforce platform limitations with paid editions, you’ll need to reach out to Salesforce support.
Also, note that organizations using Developer Edition under a trial period can only send up to 10 emails to external email addresses.
Bonus Tip: Deliverability Considerations
Even though you can send mass emails with Salesforce integration, it’s crucial to maintain good deliverability and avoid practices that may result in your emails being marked as spam. If you want the details, check our blog post – “Email deliverability: everything you need to know”.
Lastly, the limitations mentioned above could be subject to change, and it’s advisable to refer to the official Salesforce documentation for the most up-to-date information regarding mass email limits.
How to send mass emails in Salesforce?
Here, we’ll talk about sending mass emails in Salesforce Classic, so it’s more geared to legacy users (those who began using Salesforce prior to 2018 but still haven’t switched). However, we also cover Lightning Experience later in the article.
Note: Make sure to enable mass email with your Salesforce implementation. If that’s not done, you’re likely to get a message similar to the one below.
System.EmailException: SendEmail failed. First exception on row 0; first error: NO_MASS_MAIL_PERMISSION, Single email is not enabled for your organization or profile.: []Create a mass mailing list of Contacts or Leads
- Navigate to Contacts or Leads
Click the Contacts or Leads tab, depending on the type of recipients you want to include in your mass email.
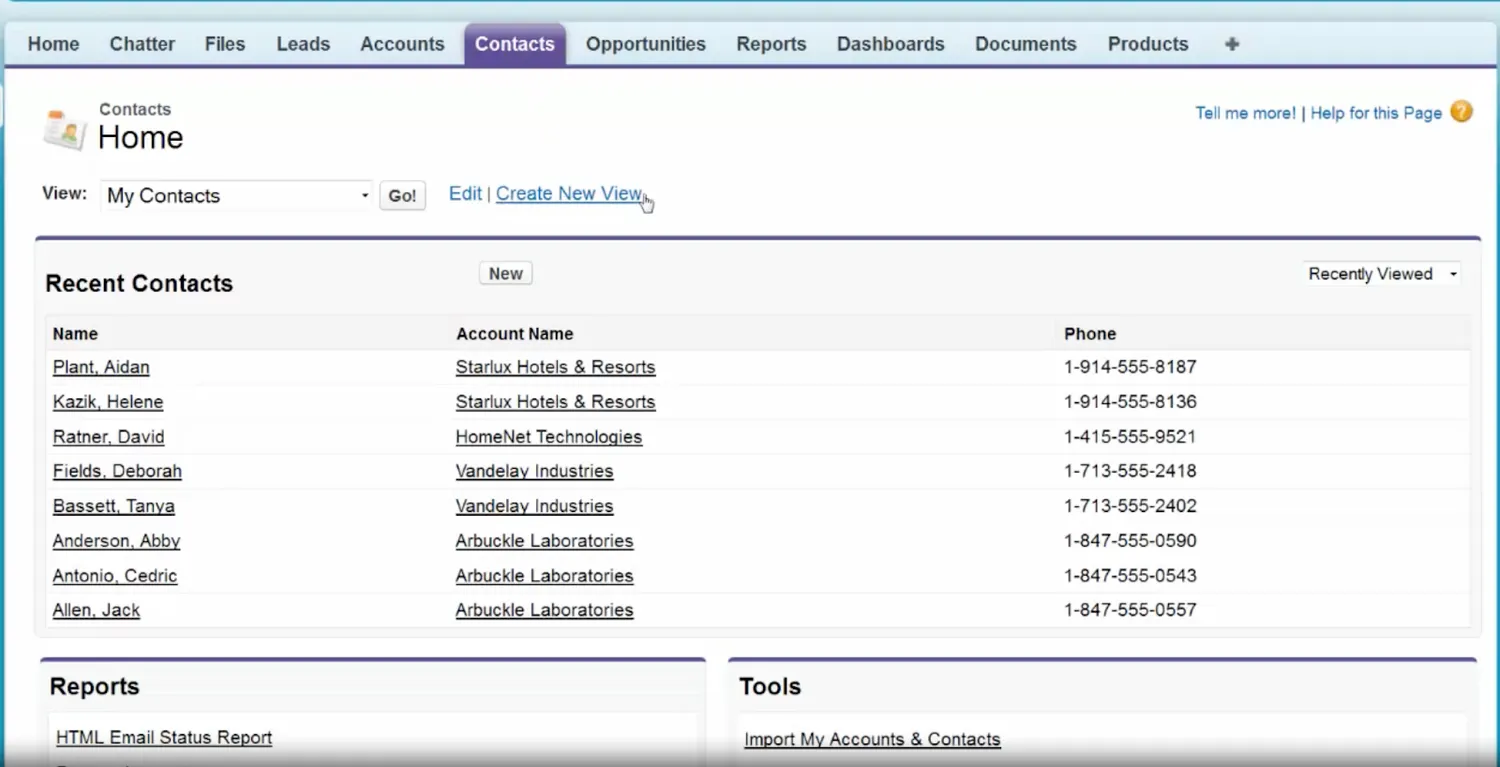
Scroll down to the Tools section, and click Mass Email Contacts.
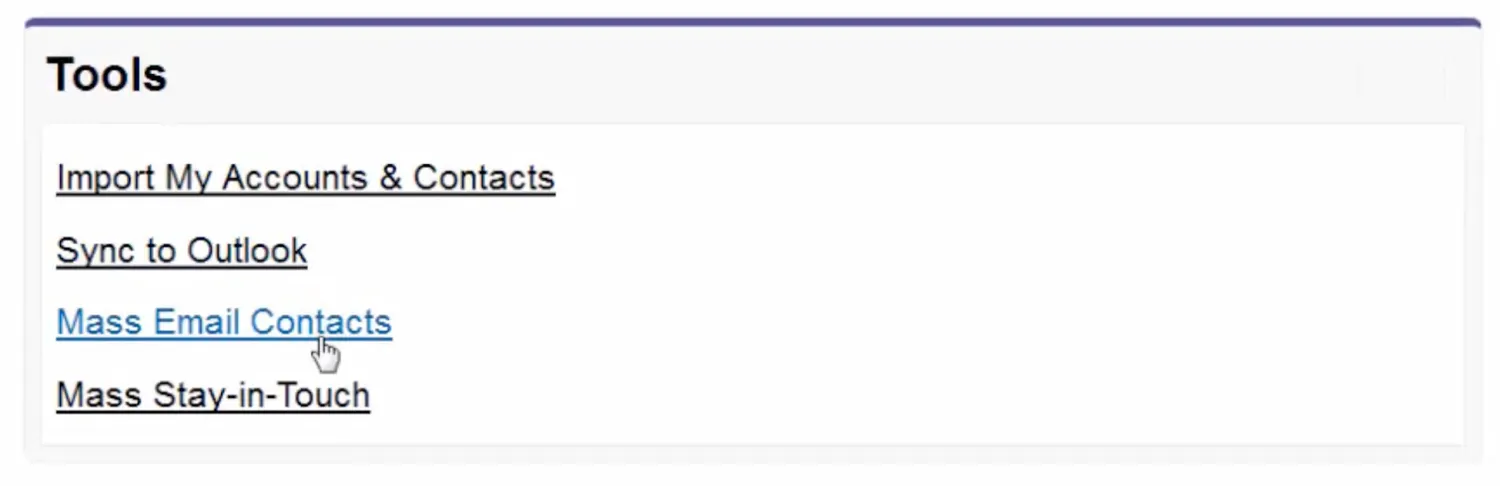
2. Follow the Mass Email tool wizard
After clicking Mass Email Contacts, you enter a four-step process to set up and customize your mass email campaigns.
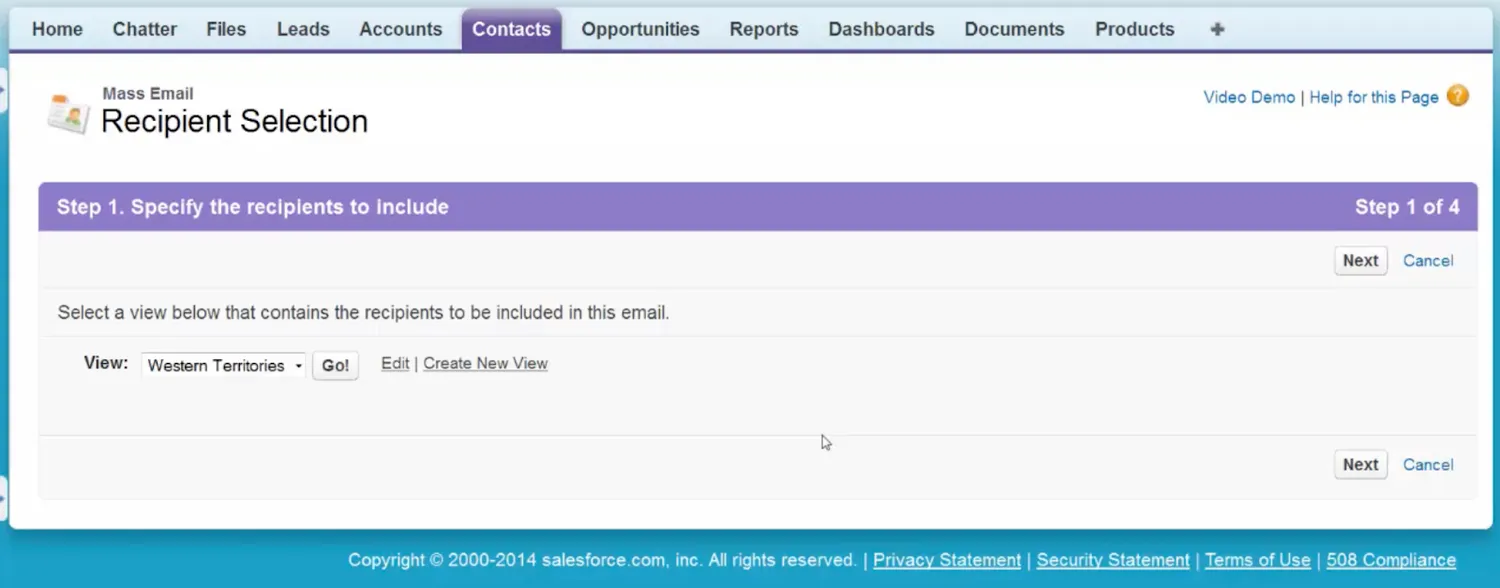
First, you need to choose the recipients for the campaign. Then, choose a View from the drop-down menu, or click Create New View. For the purposes of this tutorial, we’ll choose the latter.
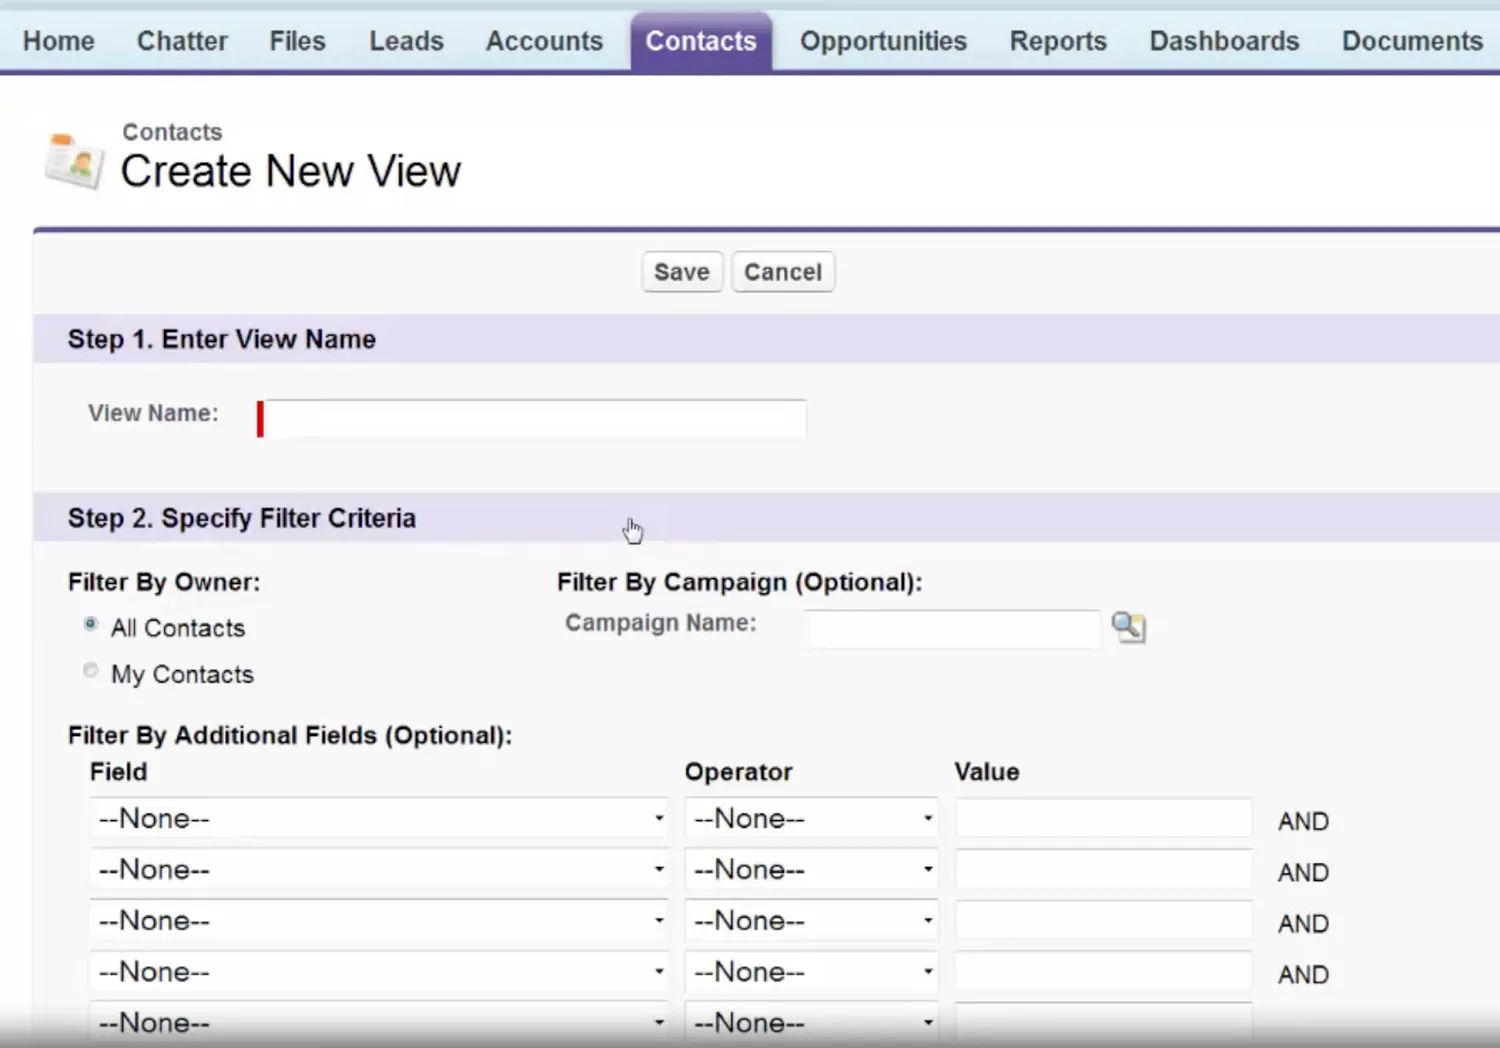
Next, add the View name, and use filters, such as specific fields, campaign membership, or custom criteria, to narrow down your target audience.
Make sure to leverage specific Salesforce customization options and select filters and criteria only for the mass email leads you’d like to contact.
Salesforce offers quite a few filtration options and allows you to choose fields to display and filter by specific fields. That allows you to create a mass email list, zeroing in only on the user cohort you wish to contact.
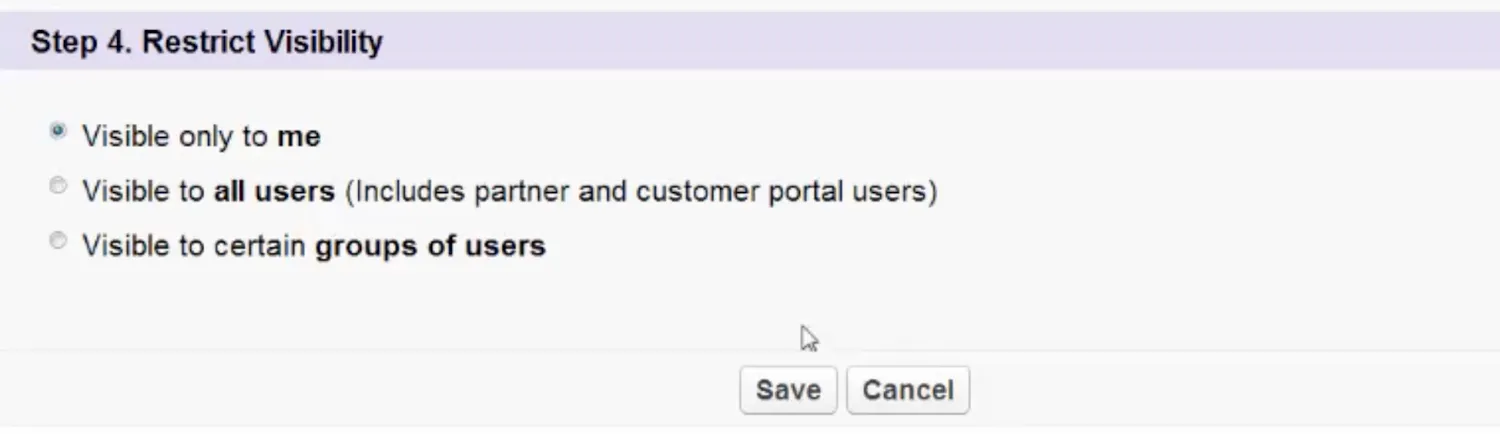
Also, you can change the visibility of your campaign under Step 4.
3. Save the Mailing List:
Once you have defined your criteria, save the mailing list. Upon clicking the button, you’ll see the filtered list of recipients. You can add or remove recipients by checking or unchecking the box in front of their names.
4. Choose an email template
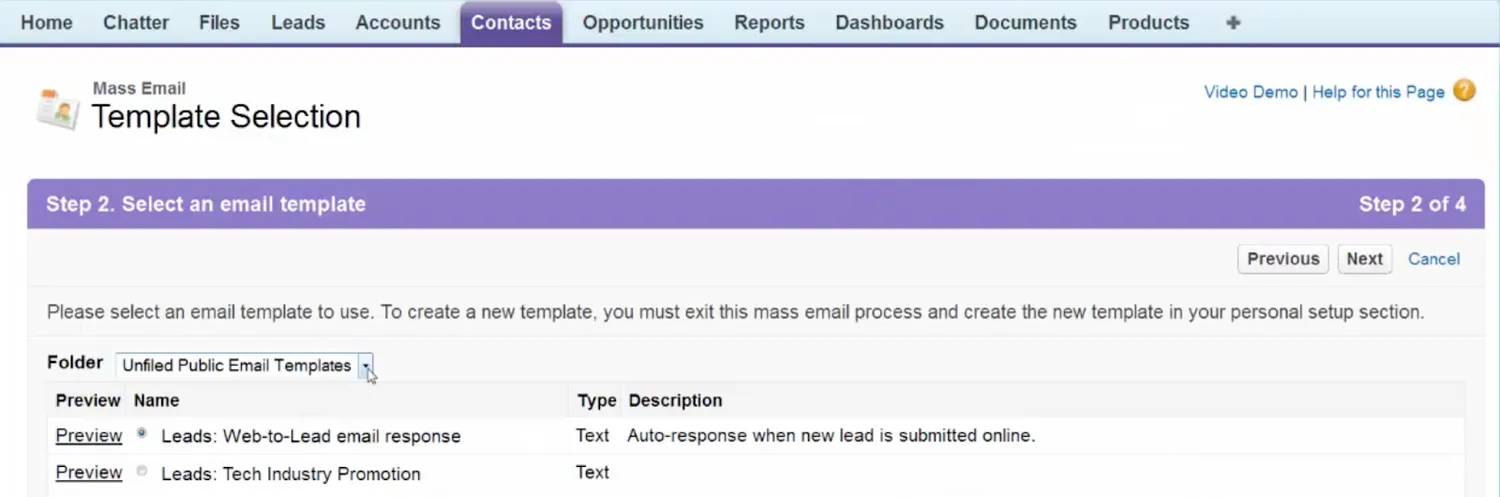
After saving the list, you move to Step 2 of Mass Email with Salesforce. Here, you choose the email template. Keep in mind that you can’t create a new template at this step.
5. Confirm your choice and send
Step 3 gives you the option to BCC an email copy to yourself, you can create a custom Mass Email Name, and send it immediately, or schedule the campaign.
A scheduled email has a “pending” status until sent, and you can cancel it anytime prior to the due date/time.
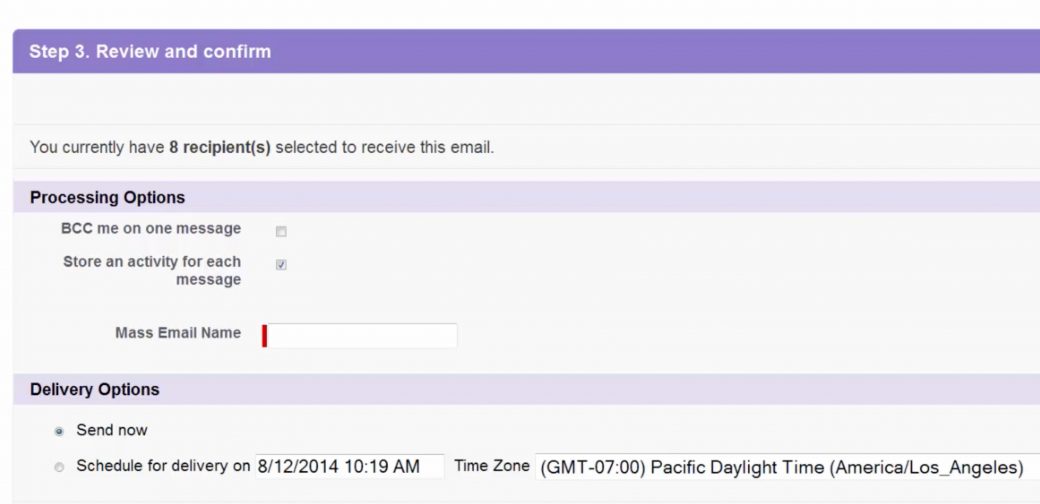
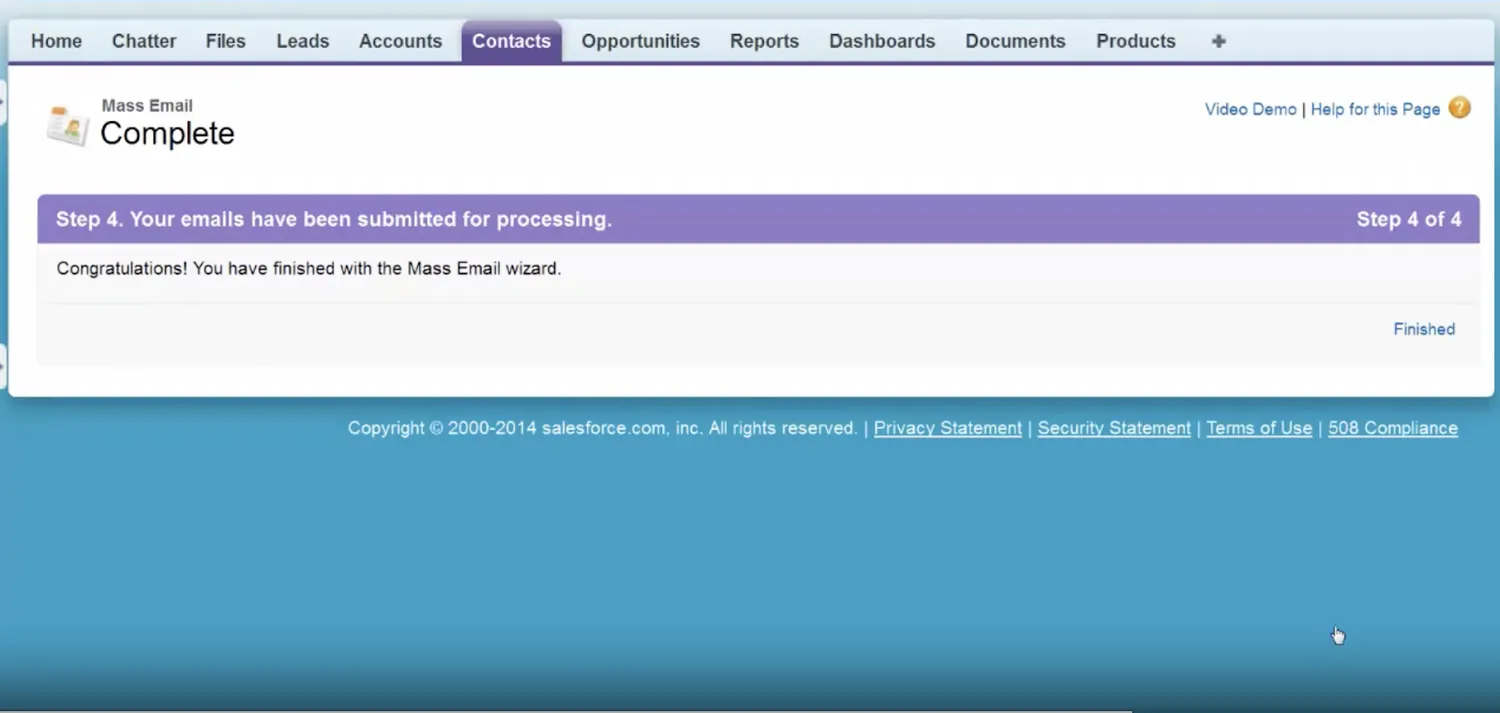
Should you choose to hit the Send button, your email gets sent immediately, and you’ll get the confirmation window.
6. Check status and manage
To see the status of your emails and manage campaigns, you need to do the following.
- Click your account name in the upper right section and choose My Settings.
- Select Email in the side menu, then click Mass Email.
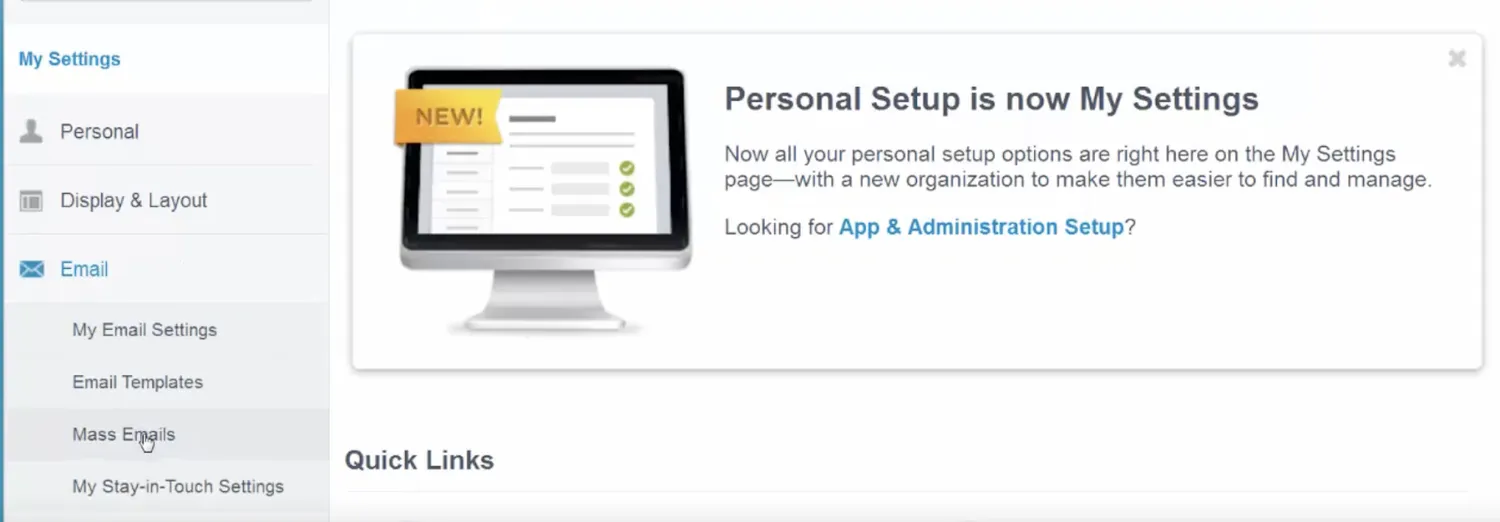
3. Check the list of all your campaigns per the selected View. This is also where you can cancel pending campaigns.
Sending bulk emails in Lightning Experience
Overall, the processes and functionalities are mostly consistent across Salesforce Classic and its revamped sibling. Though, we should stress that Salesforce Lightning is more feature-rich, particularly in the area of data management, analytics, and marketing automation. And sending bulk emails in Lightning Experience is faster and more user-friendly.
However, we won’t focus on features comparison here. Instead, we’ll show you the most effective way to send mass emails and highlight any significant differences, if necessary.
- Create an email template
Click the App Launcher (nine colorful dots) in the upper left corner of the screen, type ‘Email Templates’, and hit enter.
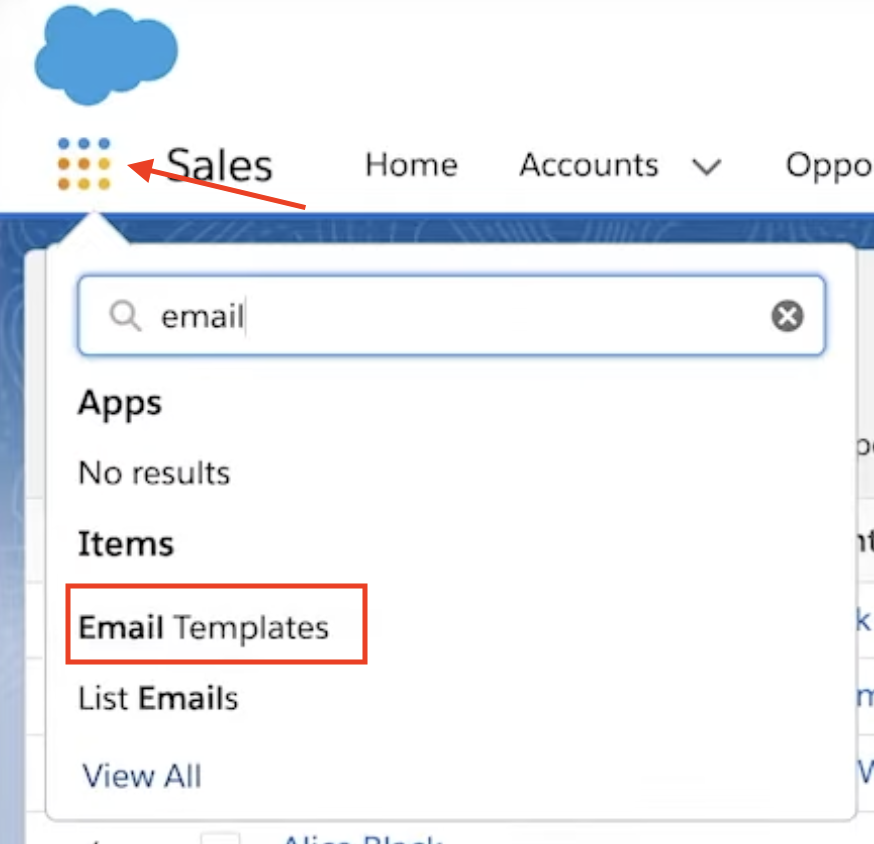
Click the New Email Template button, and create your template. Make sure to include the subject, message body, and any merge fields or templates you wish to utilize, then Save it.
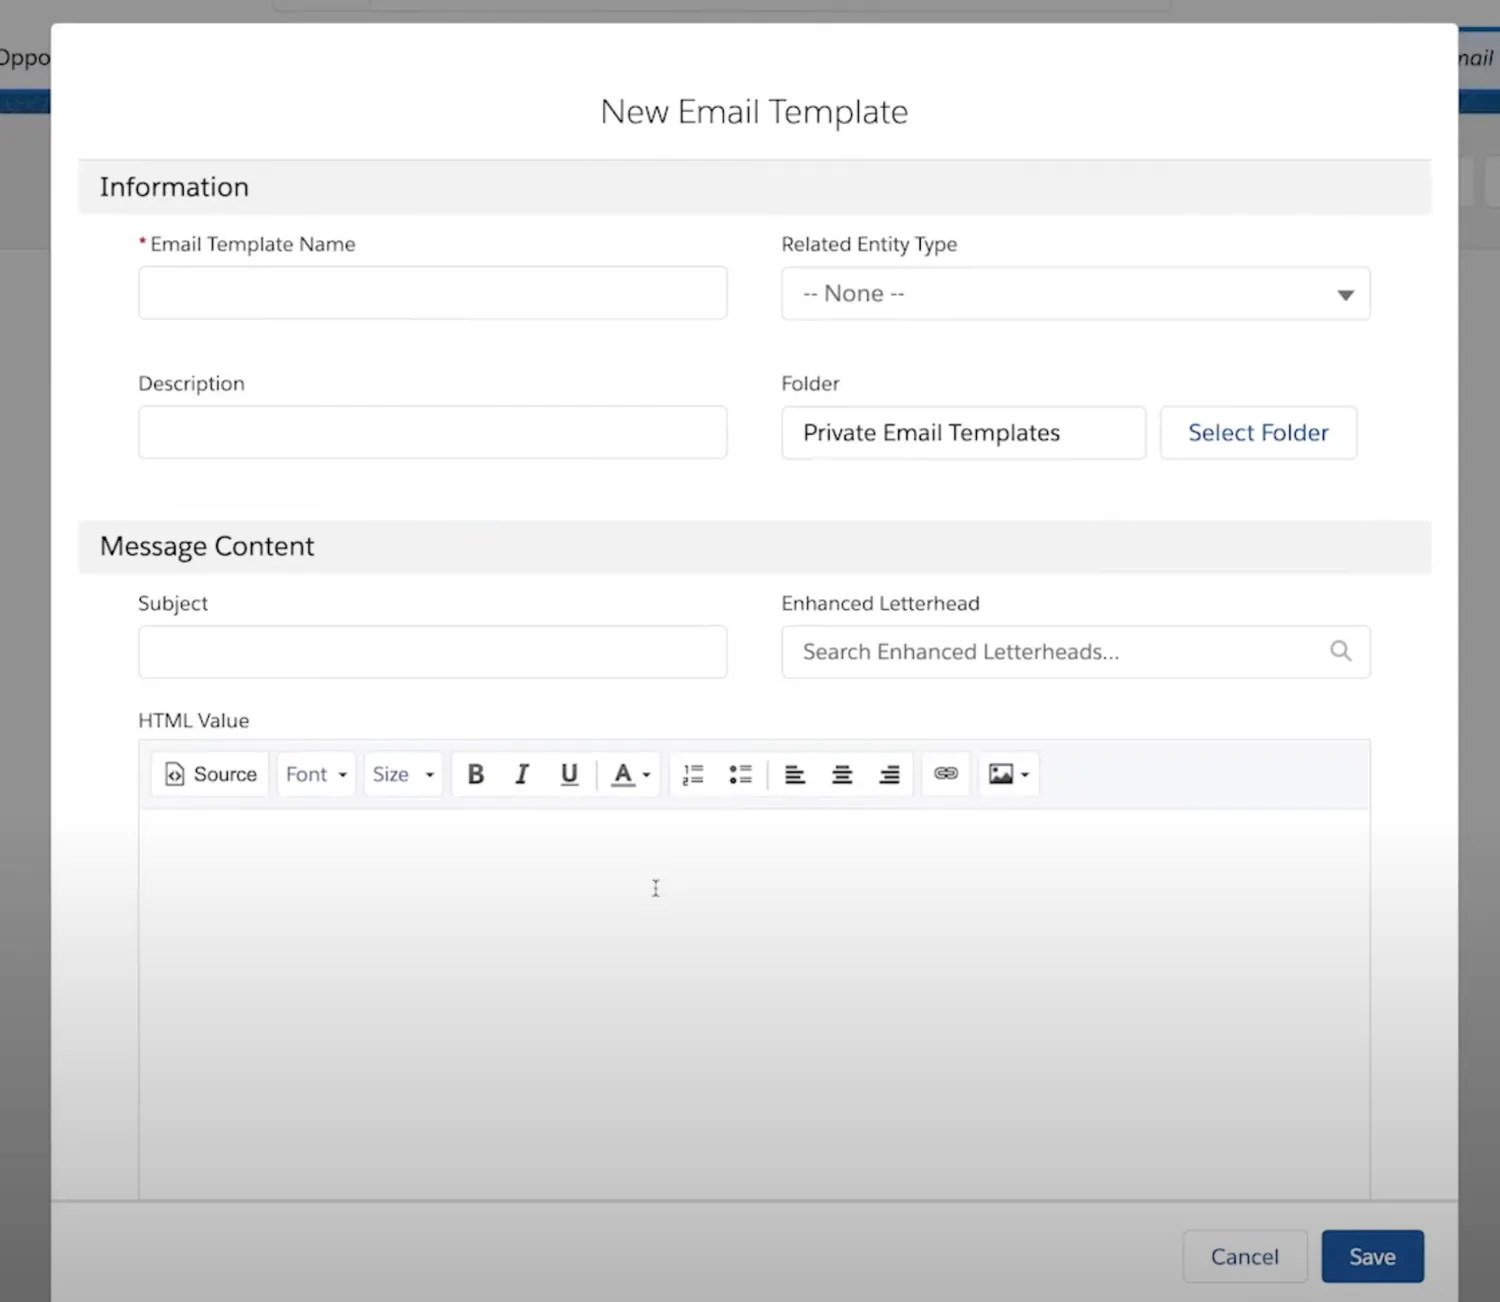
Note: You don’t have to start by creating a template, you can do it later, or select one of the existing templates.
2. Navigate to Send List Email
In Lightning Experience, the feature is actually called Send List Email, instead of Mass Email. And it appears under the Contacts, Leads, or Campaign Member view. And the steps are largely the same regardless of the method you choose.

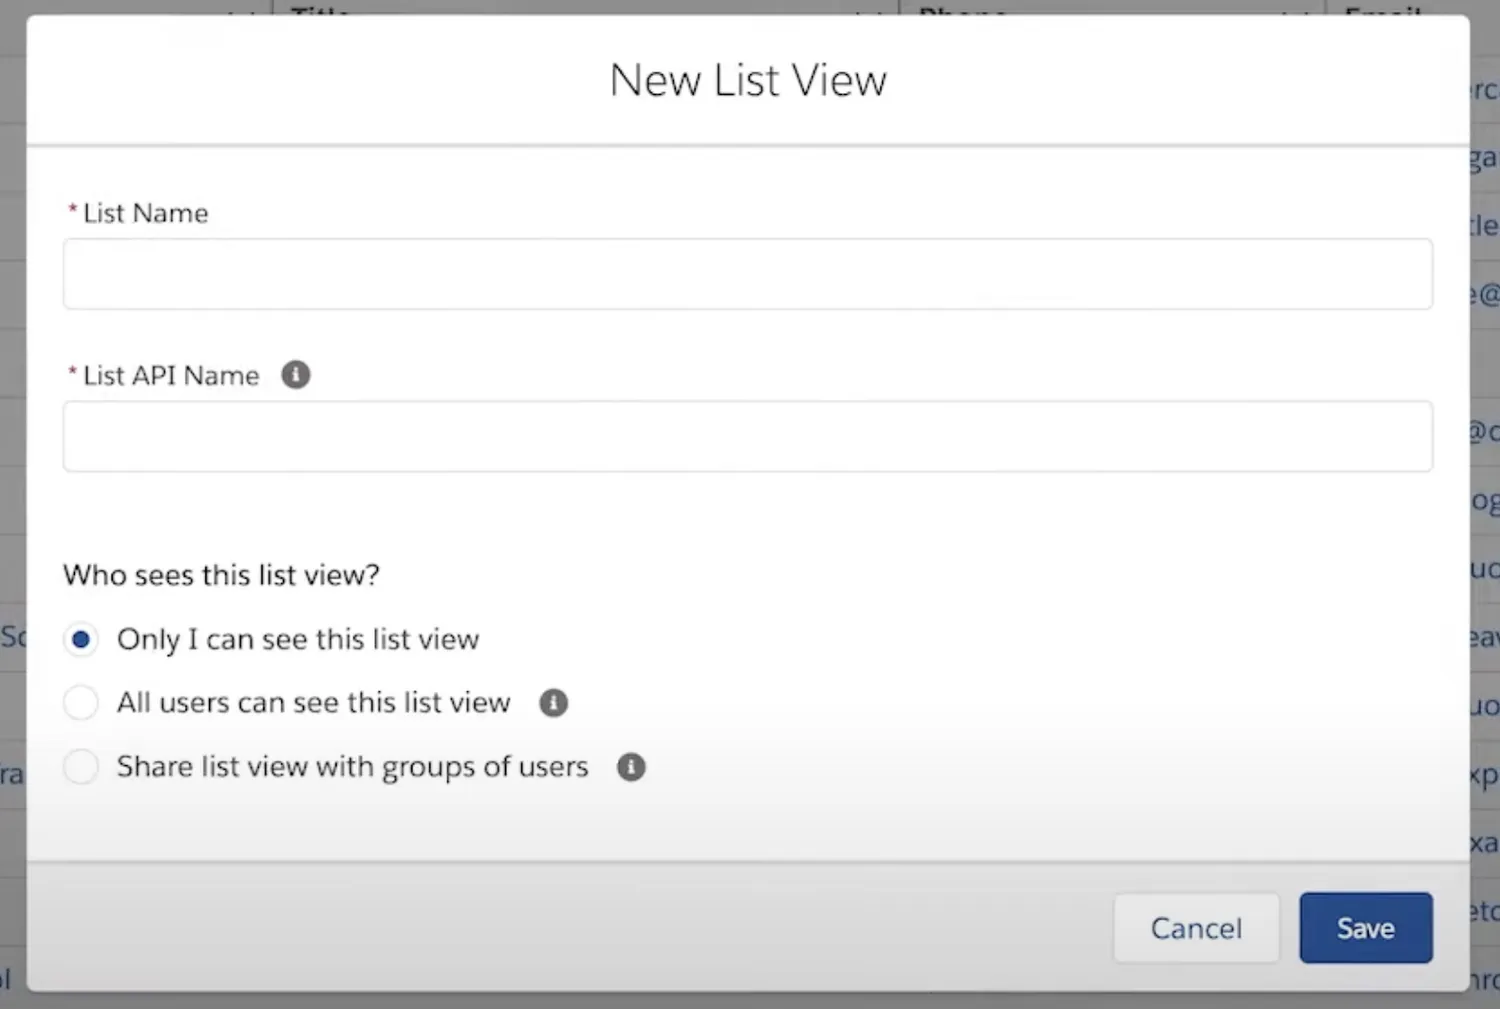
Click Send List Email and, under New List View, type List Name and List API Name into the designated fields. Then, choose ‘view permissions’ and click Save.
3. Select the Recipients
Hover over the Filter by Owner box and choose the contacts to send bulk email to.
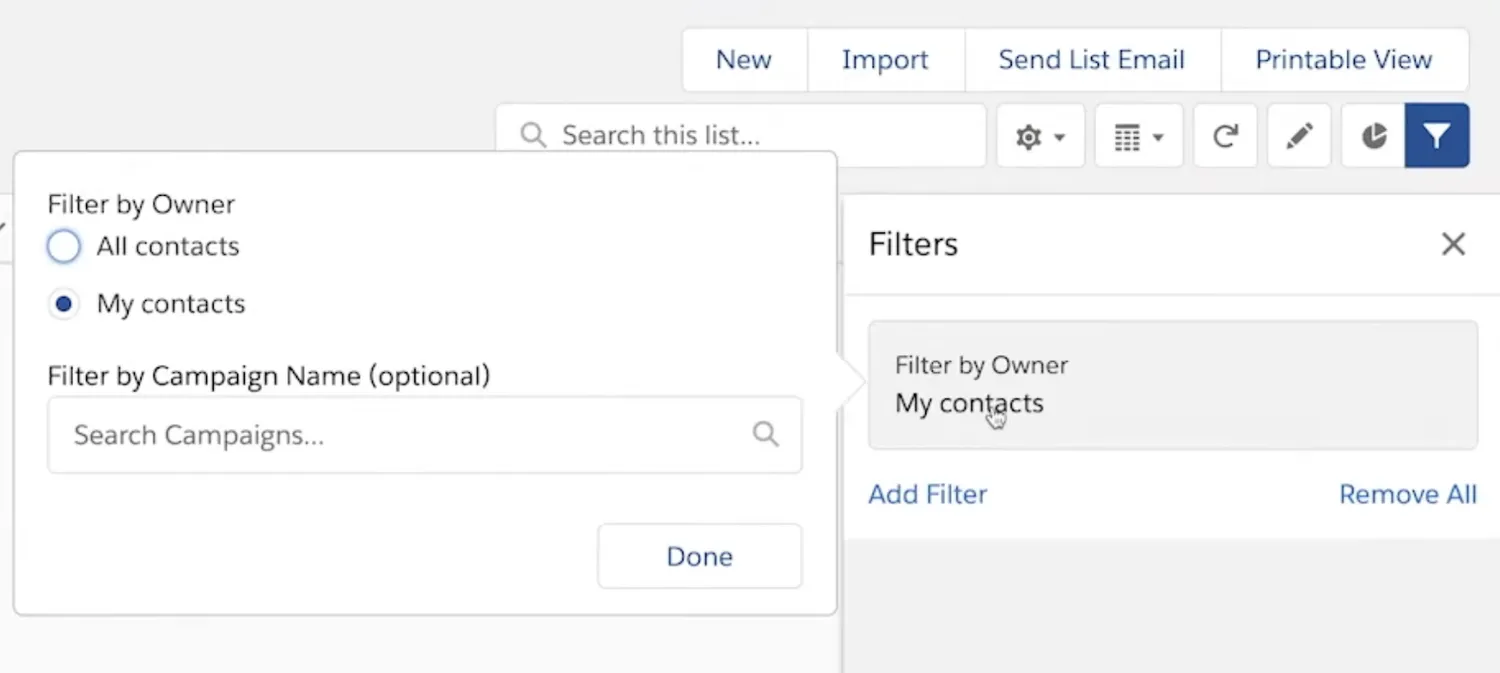
Proceed to Add Filter and segment your recipients based on the given Field, Operator, and Value criteria.
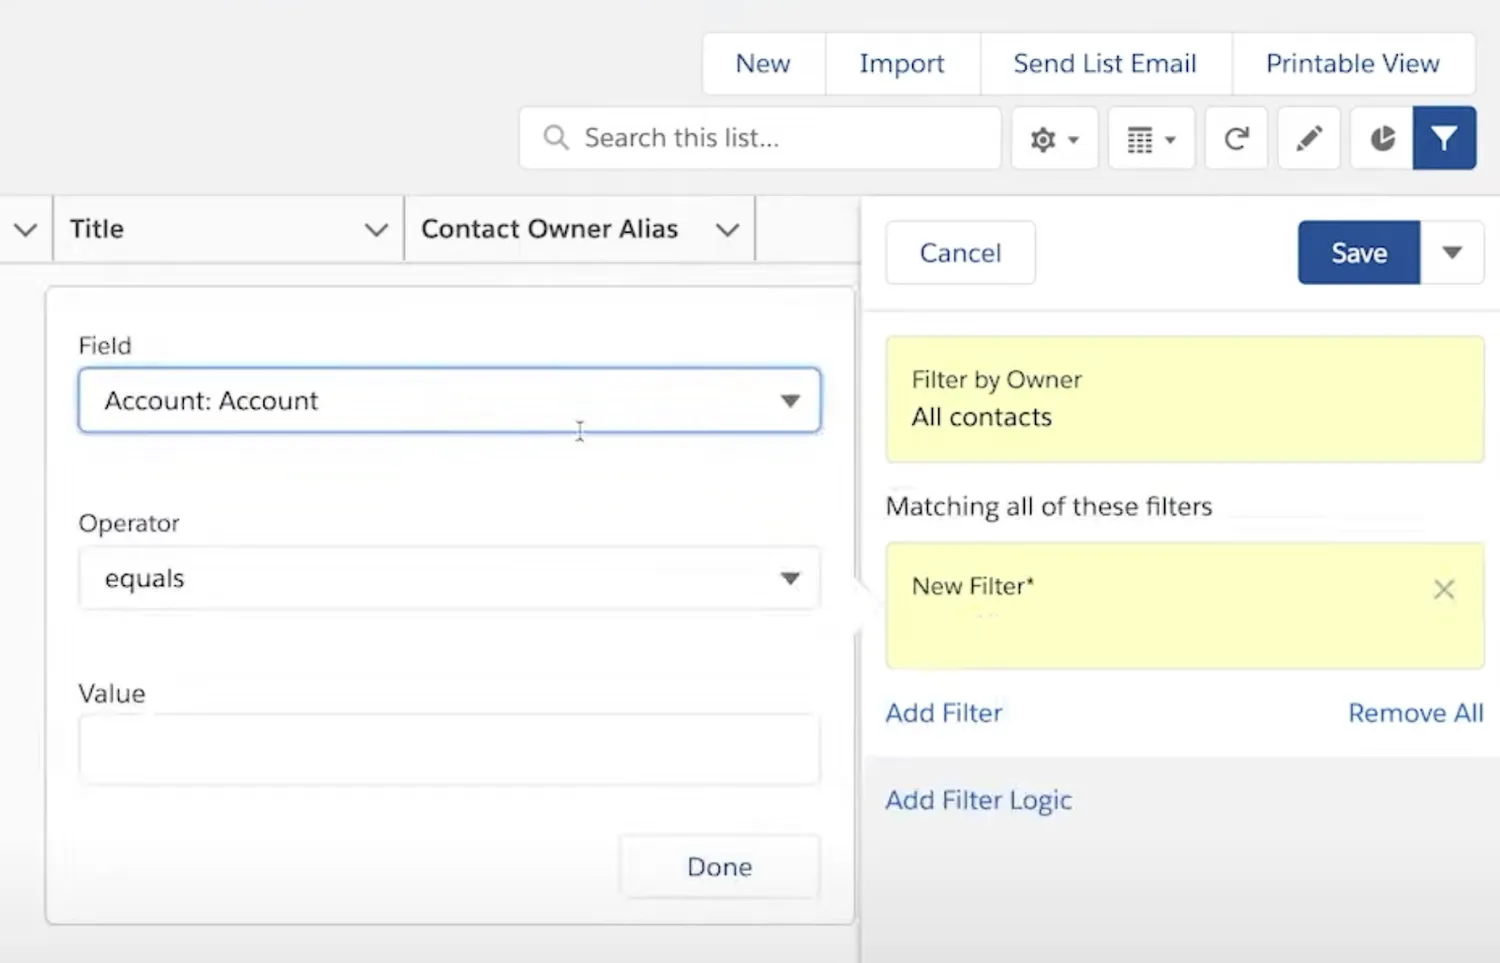
Depending on your requirements, you can opt to send the email to specific campaign members, contacts, or leads from a report, or custom lists. Plus, you can use the Add Filter Logic option to give your list another dimension.
4. Review and Send
Before sending the email, take a moment to review the recipient list, email content, and any attached files. Ensure everything is accurate and aligns with your intended communication.
Afterward, click the Send List Email button, then the Insert, create, or update template icon. Insert the template you created in the first step; here you can also add merged fields by clicking on the ‘braces’ icon.
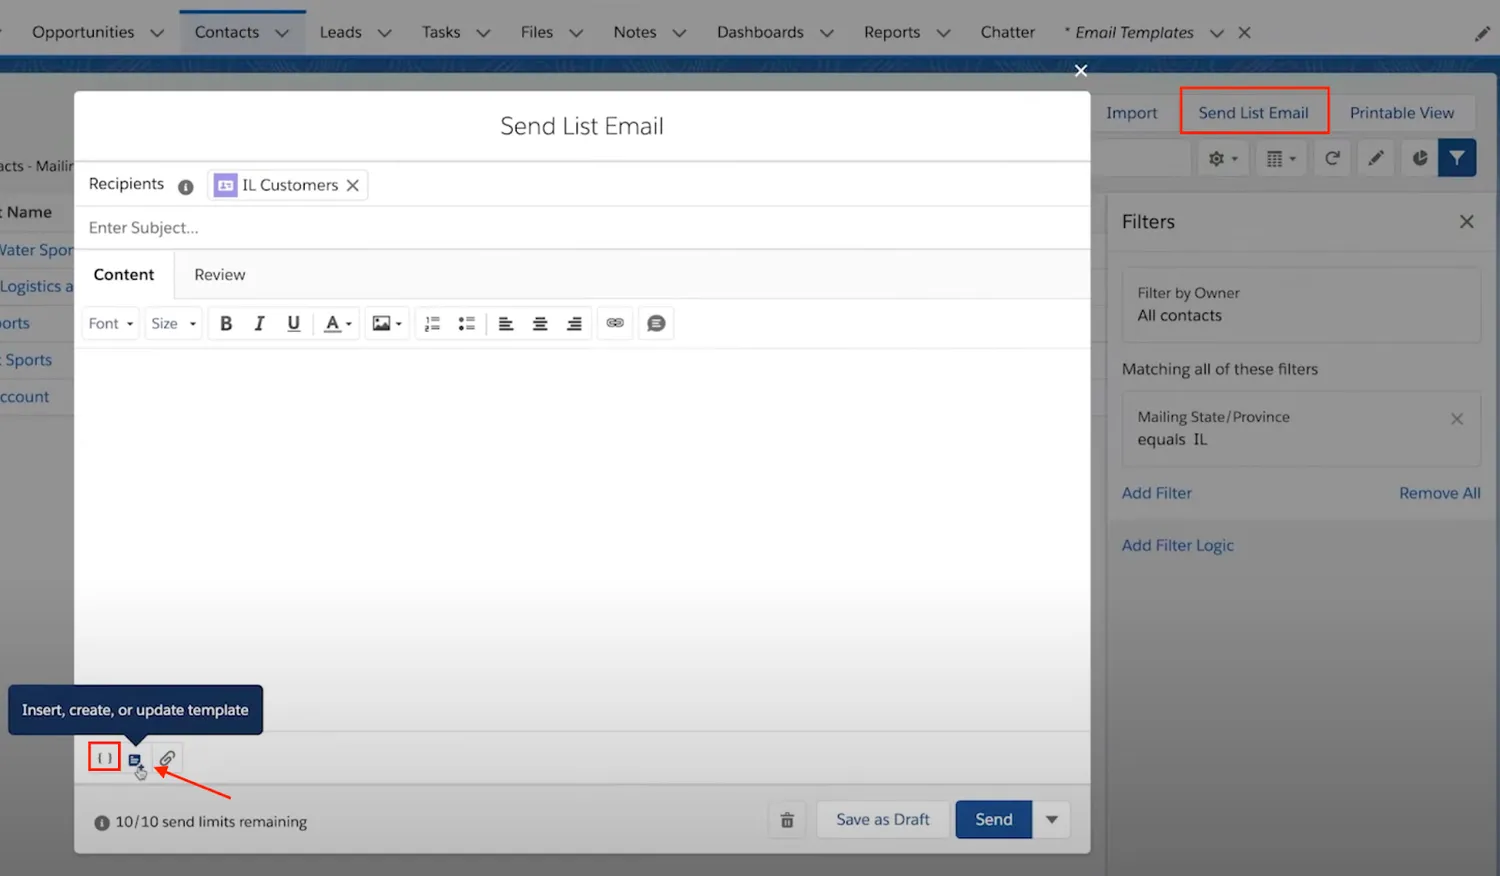
Once you confirm all’s well and you’re sending to the right recipients, hit Send, and your campaign will be deployed.
How to send mass email through Batch Apex in Salesforce
In addition to the built-in Mass Email or Send List Email functionality, Salesforce provides Apex, a versatile object-oriented language, similar to Java.
By leveraging Apex, you can automate the process of sending bulk emails, enabling you to handle larger volumes of email communications.
Let’s explore how you can send mass emails through Apex in Salesforce.
- Import statements and create an Apex class:
Begin by importing statements and creating an Apex class that implements the ‘Batchable’ interface. This class will define the logic and behavior for sending the mass email.
Here are the import statements.
import Database;

import Messaging;
Note: Importing Database and Messaging is optional.
And you define the class using the following line.
public class MassEmailBatch implements Database.Batchable<sObject> {This declares a class named MassEmailBatch that implements the Database.Batchable<sObject> interface. It signifies that this class can be used as a batch job for processing records.
2. Implement the Start, Execute, and Finish Methods
In the Apex class, implement the Start method, which retrieves the collection of records to process (your recipients, in this particular case). This can be based on criteria or queries.
public Database.QueryLocator start(Database.BatchableContext context) {

    String query = 'SELECT Email, Name FROM Contact WHERE Email IN (\'fd547125b4-5ea78e@inbox.mailtrap.io\')'; //SELECT Id, Email, Name FROM Contact WHERE <your_criteria_here>

    return Database.getQueryLocator(query);

}
To stress, the start method is required for a batch job and specifies the initial step of the batch process. It returns a Database.QueryLocator object that defines the records to be processed.
In this case, the method queries the Contact records based on specific criteria and returns a query locator for those records.
Reminder: Don’t forget to specify the criteria under <your_criteria_here>
That out of the way, you can implement the Execute method, where the script iterates through the collection of records and constructs personalized email messages using Apex Email Messaging classes.
public void execute(Database.BatchableContext context, List<sObject> scope) {

    List<Messaging.SingleEmailMessage> emails = new List<Messaging.SingleEmailMessage>();


    for (sObject record : scope) {

        Messaging.SingleEmailMessage email = new Messaging.SingleEmailMessage();

        email.setSubject('Your Subject Here');

        email.setPlainTextBody('Hello,\n' + String.valueOf(record.get('Name')));

        email.setToAddresses(new String[] { (String) record.get('Email') });


        emails.add(email);

    }


    Messaging.SendEmailResult[] results = Messaging.sendEmail(emails);


    for (Messaging.SendEmailResult result : results) {

        if (result.isSuccess()) {

            // Email sent successfully

            System.debug('Email sent successfully');

        } else {

            // Handle any errors or exceptions

            System.debug('Error sending email: ' + result.getErrors()[0].getMessage());

        }

    }

}
This is where the actual record processing takes place. The script receives a batch of records (a scope) to process. In our example, it iterates through each record and constructs a personalized email message using the Messaging.SingleEmailMessage class.
The script then sets the email subject, plain text body, and recipient’s email address based on the record’s data.
The constructed email messages are added to the email list. After all the records are processed, the Messaging.sendEmail method is used to send the batch of email messages. The Messaging.SendEmailResult array contains the results of the email-sending operation, which are then processed to check for any errors or exceptions.
Lastly, you’ll need to implement the Finish method, which handles any necessary cleanup tasks or post-processing actions.
public void finish(Database.BatchableContext context) {

    // Perform any necessary cleanup tasks or post-processing actions

}
For your reference, here’s the full script.
import Database;

import Messaging;


public class MassEmailBatch implements Database.Batchable<sObject> {


    public Database.QueryLocator start(Database.BatchableContext context) {

        // Retrieve the collection of records to process based on specific criteria or queries

        String query = 'SELECT Email, Name FROM Contact WHERE Email IN (\'fd547125b4-5ea78e@inbox.mailtrap.io\')'; //SELECT Id, Email, Name FROM Contact WHERE <your_criteria_here>

        return Database.getQueryLocator(query);

    }


    public void execute(Database.BatchableContext context, List<sObject> scope) {

        List<Messaging.SingleEmailMessage> emails = new List<Messaging.SingleEmailMessage>();


        // Iterate through the collection of records and construct personalized email messages

        for (sObject record : scope) {

            // Construct the email message using Apex Email Messaging classes

            Messaging.SingleEmailMessage email = new Messaging.SingleEmailMessage();

            email.setSubject('Your Subject Here');

            email.setPlainTextBody('Hello, ' + String.valueOf(record.get('Name')));

            email.setToAddresses(new String[] { (String) record.get('Email') });


            emails.add(email);

        }


        // Send the batch of email messages

        Messaging.SendEmailResult[] results = Messaging.sendEmail(emails);


        // Process the results if needed

        for (Messaging.SendEmailResult result : results) {

            if (result.isSuccess()) {

                // Email sent successfully

                System.debug('Email sent successfully');

            } else {

                // Handle any errors or exceptions

                System.debug('Error sending email: ' + result.getErrors()[0].getMessage());

            }

        }

    }


    public void finish(Database.BatchableContext context) {

        // Perform any necessary cleanup tasks or post-processing actions

    }

}
3. Send with email template
Create and customize the template according to your needs and include any merge fields as required. You can do all that within the Salesforce interface, but make sure to save the template ID to reference it in the code.
Now, we’d need to rework the ‘execute’ method so it references a template, here’s the snippet.
public class MassEmailBatchWithTemplate implements Database.Batchable<sObject> {


    public static final String EMAIL_TEMPLATE_NAME = 'MyTemplate';


    public Database.QueryLocator start(Database.BatchableContext context) {

        // Retrieve the collection of records to process based on specific criteria or queries

        String query = 'SELECT Email, Name FROM Contact WHERE Email IN (\'fd547125b4-5ea78e@inbox.mailtrap.io\')'; //SELECT Id, Email, Name FROM Contact WHERE <your_criteria_here>

        return Database.getQueryLocator(query);

    }


    public void execute(Database.BatchableContext context, List<sObject> scope) {

        List<Messaging.SingleEmailMessage> emails = new List<Messaging.SingleEmailMessage>();


        // Get the email template

        EmailTemplate emailTemplate = [

            SELECT Id, Subject, Body, HtmlValue

            FROM EmailTemplate

            WHERE Name = :EMAIL_TEMPLATE_NAME

            LIMIT 1

        ];


        // Iterate through the collection of records and construct personalized email messages

        for (sObject record : scope) {

            // Construct the email message using Apex Email Messaging classes

            Messaging.SingleEmailMessage email = new Messaging.SingleEmailMessage();


            // Set the email template ID

            email.setTemplateId(emailTemplate.Id);

            // Set the email template Subject

            email.setSubject(emailTemplate.Subject);

            // Set the email html Body

            email.setHtmlBody(emailTemplate.HtmlValue);

            email.setToAddresses(new String[] { (String) record.get('Email') });


            // Set the target object ID

            email.setTargetObjectId((Id) record.get('Id'));


            emails.add(email);

        }

    }

}
Here’s what we did:
- Added the line
email.setTemplateId('<your_template_id_here>');to set the ID of the email template you want to use. Replace<your_template_id_here>with the actual ID of your email template. - Added the line
email.setTargetObjectId((Id)
record.get('Id'));
to set the ID of the recipient object. This can be the ID of the contact, lead, or user to whom you want to send the email.
Thank you for choosing this part of the article! Read full version of the article in Mailtrap blog and discover how to test emails in Salesforce!