In my opinion, this key should not be removed unless absolutely necessary.
It is much more difficult to reattach than other previous Mac keyboards. Including the AA-powered wireless keyboard from previous generations.
If you want to check whether your spacebar clicks are working or not. Spacebar clicker is the best site for checking your clicks. Also, I have used this site and found it to be very helpful.
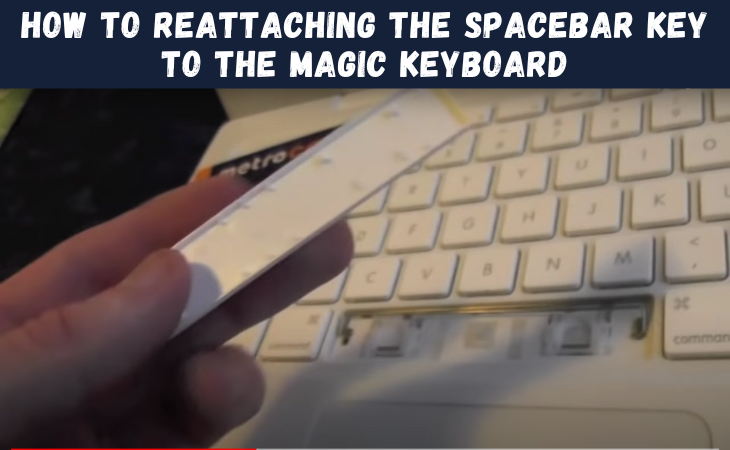
Step 1 - Remove Spacebar
- Performing this procedure is challenging. Reattaching the space bar is very difficult. The keyboard is much more difficult than previous Mac keyboards. The risk of permanent damage exists if replacement is attempted.
- The spacebar can be removed by gently prying it up with a long fingernail
Step 2 - Identify orientation
- Identify the Spacebar's top and bottom.
- On the bottom side of the keyboard (the side that is closest to the lower edge), two plastic notches are present. Those notches will grab onto the small holes in the two scissor mechanisms.
Step 3 - Inspect for Damage
- To grip the bracket arms, locate the small metal hooks that hold the bracket arms and hook them inward.
- You may not be able to replace your key if the metal bracket holders are bent.
- There should be no bends in these as they emerge from the keyboard. It may be necessary to use pliers or your fingernail to straighten out the broken key if you have tried replacing it repeatedly.
Step 4 - Remove Lower Stabilizer Bracket
- Pry off the lower metal bracket with your fingernail by gently prying it off.
- You don't have to worry about breaking anything. In most cases, they can be snapped out and reinstalled safely.
Step 5
- Make sure the bottom of the key is in the opening and the top is tilted away from the keyboard.
- If you want to put the top bracket into its spot in the hole, you may want to take the key's top bracket off. I've done this both on and off.
- You should start at the bottom of the key and slide your fingers upward.
- There should be two lower connections to the scissors that you can hear and feel. The top bracket should naturally be positioned correctly.
- It should be possible to tap on the key and feel the top part of it respond normally. It doesn't matter where you tap it on the top half.
- Avoid applying excessive pressure. In previous Mac keyboards, you could just push down hard and it would work. Make sure you only apply enough pressure to seat the key.
Step 6 - Add Lower Bracket
- Take care not to pull the scissor connection points away from the bottom of the Space key as you lift it up.
- Make sure the bracket is properly positioned below the spacebar. Push the bracket in until it is seated properly.
- The key should be gently tapped around the bottom of the keyboard. As shown in previous mac keyboard spacebar repair videos, do not apply excessive force.
- As soon as you press down on one of the space key's four corners, a space will appear.